Toilet Paper Roll DIYs for Kids
For all of the below toilet paper roll crafts, you’ll need:
- Empty toilet paper rolls
- Craft paint, colored pencils or textas
- A pair of scissors
- Stapler
- Glue
- Pencil & rubber/eraser
Toilet Paper Roll Fish
These toilet paper roll fish aren’t just fun to make, they’re also gorgeous! Try using gold or silver paint to give your fish scales an extra pop.

Step 1
Ready your supplies! We used acrylic paint, but cheaper craft paint or even just textas/crayons could do the trick too.
Step 2
Apply a base coat of paint to your empty toilet paper rolls. In the end, we created 5 fish but you can have as few or as many as you like!
Step 3
Creating scales by painting simple ‘U’ shapes onto the toilet paper roll. Tip: use gold, silver or white paint for the scales.
Step 4
Create your fish tail and fins by painting a very simple outline onto thick white paper (we used acrylic paper). Tip: Parents might need to lend a hand for this step.
Step 5
Using a pair of scissors, carefully cut out the fish tail shapes.
Step 6
Match the colour of the fish tails and fins with the colour you used to paint the fish scales.

Step 7
Staple the fish tail in place.
Step 8
Cut out the fish fins.
Step 9
Create the fish lips by painting long, thin strips of acrylic paper in a shade of red or pink.
Step 10
Once dry, wrap the fish lips around the mouth of your toilet paper fish, and cut any excess length.
Step 11
Create a fish eye by painting or drawing a black dot and then carefully cutting a circle around it (leaving some white space). Glue the eyes in place on either side of the toilet paper roll.
Step 12
Voila! You’re done! Have fun creating your own school of colourful fish.

Toilet Paper Roll Frog
These toilet paper roll frogs aren’t only colourful and fun, but they also double as a game! Try to catch the fly in the frogs mouth. Create multiple toilet paper frogs and play against your friends. First one to catch the fly, wins!

Step 1
Collect your supplies! Most importantly, your empty toilet paper rolls.
Step 2
Paint the toilet paper rolls green and leave to dry.
Step 3
Paint light green spots onto your toilet paper rolls.
Step 4
Draw an outline of frog legs onto acrylic paper. Tip: This is a tricky step and might require help from a parent or older family member.
Step 5
Paint your frog legs and leave to dry.
Step 6
Carefully cut out your frog legs.

Step 7
Trace and cut out a fly-shape from acrylic paper (or cardboard) and attach it to the end of a length of string (approximately 20cm).
Step 8
Staple one end of the string to the frog legs.
Step 9
Paint a long, thin strip of paper red and wrap it around the toilet paper roll. Trim any excess length using a pair of scissors.
Step 10
Pull the length of string through the toilet paper roll and stape the back legs in place. Staple the front legs in place too.
Step 11
Create eyes by painting or colouring two black dots onto white paper (we used acrylic paper) and carefully cutting a circle around the black dots (being sure to leave some white space).
Step 12
Glue the eyes in place, and you’re done!

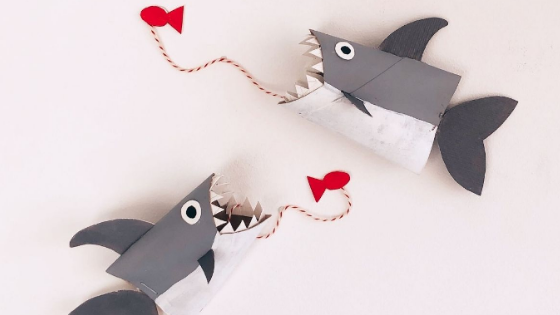
Toilet Paper Roll Shark
Sharks are super cool aquatic creatures. Why not create your own toilet paper roll sharks? This craft also doubles as a game. See who can catch the fish in the shark's mouth first and challenge your friends!

Step 1
Grab your supplies before you get started!
Step 2
Paint empty toilet paper rolls in a shade of grey.
Step 3
Paint the underside of your toilet paper roll white and wait for it to dry. Cut a v-shape for the shark’s mouth.
Step 4
Create a long strip of jagged paper for the shark’s teeth.
Step 5
Glue the teeth on the inside of the shark’s mouth.
Step 6
Trace the outline of the shark’s fins and tail and then paint them grey. Tip: This tricky step will require help from a parent or older family member.

Step 7
Using a stencil knife, create a slit at the top and on the sides of the shark. Push the shark fins into place.
Step 8
Create eyes by painting or colouring two black dots onto white paper (we used acrylic paper) and carefully cutting a circle around the black dots (being sure to leave some white space). Glue in place.
Step 9
Create a small fish from paper and glue it to the end of a length of string (approx. 20cm).
Step 10
Staple the other end of the length of string to the shark tail.
Step 11
Pull the fish string through the toilet paper roll and staple the shark tail in place by squeezing the sides of the toilet paper roll together.
Step 12
And you’re done! Create multiple toilet paper roll sharks and play against your friends to see who can get the fish in the shark’s mouth first.

Did you enjoy this super cool craft? Be sure to check out Babysits’ crafts for kids for more inspiration! Babysits is Australia’s babysitting community. If you’re looking for a babysitter or nanny near you, be sure to give them a go!
3 comments
Who is the best recovery expert for cryptocurrency? Consult Alpha Recovery Experts
The rapid growth of cryptocurrency has created exciting opportunities for investors and businesses worldwide. However, it has also led to an increase in scams, fraudulent schemes, and unauthorized access to digital assets. As a result, individuals who lose access to their cryptocurrency often seek professional assistance to recover their funds and strengthen their security. Among the companies operating in this space, Alpha Recovery Experts has built a reputation for providing specialized cybersecurity and ethical hacking services aimed at helping clients address complex digital asset challenges.
(https://alpharecoveryexperts.com) One of the key factors that sets Alpha Recovery Experts apart is its focus on ethical hacking methodologies. Ethical hacking involves the use of authorized security techniques to identify vulnerabilities, investigate incidents, and support recovery efforts while adhering to legal and professional standards. By combining technical expertise with a structured investigative approach, the company works to assist clients in understanding what happened to their digital assets and what recovery options may be available.
Website; https://alpharecoveryexperts.com
In addition to recovery services, Alpha Recovery Experts emphasizes cybersecurity awareness and risk mitigation. The company recognizes that preventing future incidents is just as important as addressing existing problems. Through security assessments, best-practice recommendations, and educational guidance, clients can gain valuable insights into protecting their cryptocurrency wallets, accounts, and sensitive digital information from evolving cyber threats.
For individuals and organizations seeking support with cryptocurrency-related security concerns, the company positions itself as a resource focused on technical expertise, ethical practices, and client-centered solutions.
Website; ( https://alpharecoveryexperts.com )
Email: (Alpharecoveryexpert@consultant.com)
hello everyone in this forum i am little bit ashamed to share this marvelous story about a great spell caster who helped me enlarge my small penis size through his herbal mixture cream, i was heartbroken before because i have a very small penis about 3 inches which was so annoying and shameful i could not satisfy my wife in bed ,,my marriage was really breaking and i needed help urgently, i have used pills, vaccines, drugs, surgery but none worked…so one faithful day as i was browsing through the internet i saw few comments on a forum about how Mr MARK HENRY from UK testified of how he helped him enlarge his penis and also cured his MOM diabetes type 2 disease, I contacted him through his email wealthylovespell@gmail.com he replied and gave me steps to follow and i did just as he said ,and he sent me the herbal cream to me through UPS and i received it within 4 days and used the herbal cream for just 14 days to my greatest surprise my penis that was 3 inches before enlarge to 10.5 inches long when fully erected ,for just two weeks of using his herbal mixture cream ,,wow my wife loved me more and was so happy that i can satisfy her very well now in bed ,,i even last longer than before thank you so much DR.Wealthy for making life a better one to live in ..so if you are out there having similar problems please contact him now on his email wealthylovespell@gmail.com or WhatsApp and call him on +2348105150446 thanks